Thursday, December 30, 2010

Apartment Progress...


(doors from left to right: closet, bathroom, apartment)


Considering the size of the space, I needed a 48 - 55" wide loveseat, anything bigger would be too close to the front door. There were a number of 60" ones that were great, this one in particular, but I just couldn't squeeze it in without it looking and functioning poorly. I wanted something a little low with no arms to help keep an open feel. Finally settled on this one once it went on sale 20% off. There was a large selection of fabrics it could be made in so it took me a couple weeks to choose. I took home several rounds of samples; greys, dark green, and taupe linens. I settled on a woven dark grey and ivory fabric. Eight weeks later...

The rope chair from Ikea (can't find it on their website anymore) is an outdoor chair. I'm looking for a chaise, or two small arm chairs to replace this so it's more comfortable to have friends over. When I do, I'll move the rope chair into the office/dressing area to watch tv.

I found the overhead light and considering the price, couldn't pass it up. The cord runs along the edge of where the wall juts out so it's not so noticeable and plugs in under the bookcase.

The final shot was taken before the pillows and the overhead light, but I wanted to give you the scale, see how small this place really is.

Sunday, December 26, 2010

Apartment Progress... The Entry


(before)
(progress)
(after)

Besides the fact all doors, trim, and baseboards were painted this horrible dingy off-white, there were three metal hooks on the back of the apartment door that in theory are a great idea but executed poorly. They jutted out a few inches which looked bad and installed at eye level, they almost took mine out a couple times.

The original hooks were painted over many times so my installer used a power drill to chip off the paint and unscrew them out of the door. He filled the holes, sanded down the spackle and painted the door.

The overdoor hooks are my favorite since they fit thicker doors like this and are minimal and white. Even though my coat closet is 5 ft from the front door, I prefer to hang my coat and scarves here after I wear them, A-it's easier than having to officially put them away, and B-I like them to air out a little.

(The lighting is off a bit in the first two shots, so the first shots is after I painted the walls BM Super White flat, but not the door. The second shot is after I repainted the door same as the walls but in semi-gloss. The last shots show more accurately how white it looks in person.)

Friday, December 24, 2010

Apartment Progress... Kitchen


(just after I moved in)
(sneak peak of my new sofette! next post will show more...)
(click on pics for larger view)

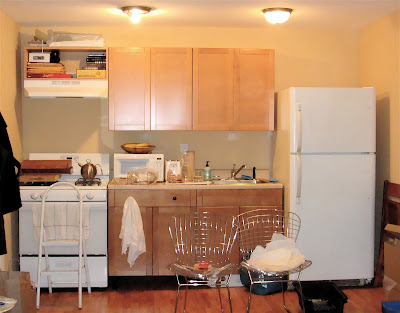
Considering the size of the apt (approx 325sqft) I just wanted the walls and kitchen white so they faded into the background. I immediately repainted all the walls, doors and trim Benjamin Moore Super White; flat for walls, semi-gloss for doors and trim. The cabinet doors were more involved to switch out so it took me a while to get to it. I gave the original doors to my landlord so he can reuse them in the apt upstairs. He didn't mind that I switched them out considering all the other improvements I've made.

The doors were $2 and $3 each (but now for some reason are 2x the price!), and the hinges were $5/door which brought the cost up to a little over $100. The cabinets aren't from Ikea and the hinges didn't line up so my installer had to drill them in. Not easy and as you can see, they're not perfect, but the original ones weren't either. And I don't care, I think this looks so much brighter and cleaner.

The stripes over the stove are the same fabric I used in the bathroom. The lion you may remember from my first and last apt, a souvenir from my sister's trip to Africa. The white boxes over the fridge store lightbulbs, vacuum bags and other household things, my paint kit, and archived items like ski pants, papers, etc. The black kettle and butcher block live on the stove; the butcher block gives me much needed surface area and I only use 1-2 cooktops at once so I don't miss the other two, I did the same thing in my last apt. I use the little black kettle (a castoff from a client) to make my coffee every morning and I like the way it looks so it stays out.

Wednesday, December 22, 2010

Readers Questions: My Wardrobe, Specific Points


some of my faves:
(some belts. top left: J Crew, Banana Republic. top right: Martin Margiela. bottom: Marni, Mint, Dries Van Noten.)
(my favorite skirt, Laura Whitcomb of Label)
(honeycomb laser-cut dress by IAN RN)
(one of many silk cami's from Jean Yu)
(my version of a sweatshirt by Dries Van Noten)

I don't have a suggested list of 'must have pieces'. I believe you should figure out how you want to look and find pieces that support that look. The reality is not everyone has the same needs for their lifestyle, desired style, body-type, and not to mention weather!

For my lifestyle, body-type, and location, my personal must have pieces are:
  • jeans; this year they're all skinny black jeans (the 4 pairs I have)
  • nice pants; not worn too often, I have 3 pairs; 2 wool, 1 silk
  • tanks; both loose and fitted (I prefer them instead of T-shirts)
  • cardigans; all weights, all lengths, multiples in same colors
  • trench coats; all weights and lengths, even ones not for the rain
  • flats (though not ballet flats)
  • tall boots; to the knee looks best on me
- I do not own:
  • rubber flip flops
  • sneakers
  • running /yoga pants
  • sweatshirts or hoodies
  • cotton-ribbed anything (universally unflattering and doesn't wash well)
- When I first went through the process, I had too many fancy clothes and shoes I had no occasion to wear, no matter how dressed down I styled them. Rule #1: don't buy super fancy clothes I won't wear...

- Considering the change in seasons, it took me about 3 years to get to the point I really loved my wardrobe, though I didn't consider it 'complete'.

- I live with what I have to see if I need more of a particular thing like cardigans which I wear everyday (I have about 8 black cardigans). I tend to wear the same thing over and over.

- I love J Crew, Alexander Wang, and Rick Owens for simple tanks, J Crew for cardigans,Barneys CO-OP for their selection of jeans, Sigerson Morrison and Loeffler Randall for shoes and boots.

- I don't like online shopping looking for 'bargains'. A bargain for me is something I love and wear time and again, not something that was on super sale. If I do go online, I stick to jcrew.com, net-a-porter.com, and barneys.com.

- I like designer consignment stores as the pieces are carefully edited and many things look like they've never been worn. My two favorite shops are in Bklyn, and Soho.


Wednesday, December 15, 2010

Readers Questions: Kicking the Shopping Habit


some pics from my inspiration file:
(paper white, unknown)


(image unknown)

(lake credenza BDDW)

Teresa asks "How did you break your shopping habit? Did you go to Shopaholics Anonymous meetings?"

As you may know, I'm a reformed shopaholic. I spent most of my time shopping, returning, had clothes in the closet never worn or worn only once, never really happy with any of it, would just continue to shop and shop... I didn't go to meetings. Here'e what I did:

About 9 years ago, I made a list of all the things I was unhappy with and wanted to change in my life. Since my home and wardrobe were at the top, I finally had to acknowledge that all these things I was buying weren't living up to the promise of making me happy.

I stopped cold-turkey, challenging myself not to buy anything for an entire month. Instead of shopping, I started to think about what I wanted out of my things. I paid attention when I was tempted to buy to find my triggers. An important lesson was 'just because something is beautiful, doesn't mean I need to buy it'.

Breaking this habit took practice, patience, self-awareness and introspection. It forced me to figure out what I wanted out of life. But by doing that, I now see all things as tools to help me live the life I want to live.

This didn't happen overnight, and it wasn't easy. I still fall into bad habits so I prepared my rules to avoid mistakes. I'm not perfect, and I do at times buy things I shouldn't. I figure out which rule I broke when I bought it, then either return it, sell it or give it away and move on...

Sunday, December 12, 2010

Making Moving Easier Step V


Step #5: Tie Up Loose Ends

In an ideal world, the previous steps would be completed before you move. This step is for after you move.

Use your mapping to get things in place. Start in the kitchen so you can eat with your plates and dishes to feel at home even if your place doesn't look like home just yet. And it gets a lot of boxes out of the way! Leave anything you're unsure of for the end to see what room is left in each cabinet, closet. Don't be surprised if you edit out more while unpacking.

IF YOU HAVE FURNITURE
Following your floor plan, set up the furniture to see if it looks as good in person as it did on paper. Play around with placement, even if it's just moving something a few inches. Look to place the pieces you're unsure of; try things you wouldn't naturally, like a dresser in a kitchen/dining area, a bookcase in a bathroom or even a closet...

IF YOU DON'T HAVE FURNITURE
Using painters tape, tape out where things will go to see and feel how your floor plan works and what size pieces are best. Live in the space for a while to see what if any changes may enhance the way you live there before buying. If you're still at a loss, most furniture stores have in-house designers that can help you at no charge. Bring your floor plan with measurements, as well as your function list.

NOTES FOR ALL
- Focus on unpacking boxes whose contents you know have to place to go.
- Keep the things that don't have a place yet and out of the way, including furniture.
- Take the garbage and recycling out on a daily basis, it makes SUCH a difference. List your used (clean) packing supplies for free on craigslist for reuse.
- Don't make the mistake of not trying something in fear it may not work. Who cares? If you don't like it, move it and try something else.
- Hang art once all the furniture is in place.

(I've been waiting to do this final post until I had the 'after' shots of the place shown in the previous steps. Sadly, sometimes my client's finish on their own and I never get to see the 'final' set-up and I failed to take progress shots. If I do go back, I'll be sure to show you...)

Wednesday, December 1, 2010

Readers Questions: My Wardrobe, Key Points


(I think this pic of me is funny. Yes, it was a
halloween party and I went as myself)

My processes are drawn from my own experiences. I've always been neat and organized but defined my sense of style and created home(s) and wardrobe without following any set guidelines. I wrote out the general processes for you and my clients to benefit from, but now here are some more personal notes...

- The biggest thing is not being influenced by others on how I should look. Growing up, people (strangers mostly) told me I was too thin, too pale, I shouldn't wear black or white... bla bla bla! I'm naturally thin and pale, and after being insecure about it, I decided it was healthier to work with what I have instead of fighting it.

- My look is mainly 'chic' and 'well-put-together' for work, casual, and/or special occasions. My casual dress has always been more dressed than others (I prefer the word 'dressed' over 'dressy' or 'dressed-up'). I'm not talking being dolled up all the time, but my idea of comfortable is not sneakers.

- I'm tactile so if I don't like the material, I don't bother with it. My clothes are mostly merino wool, cashmere, cotton, silk, and the new rayon and polyesters that look and feel like silk. Yes that means almost everything I own is dry-clean only, but I hand wash most of it.

- I've never been a big fan of color though I have worn it before. I like subtly and neutrals are more 'chic' than loud colors and patterns. Though I have a limited palate, I prefer to mix it up over being matchy-matchy; I'd never wear my ivory heals with my ivory handbag.

- I shop by myself. Friends put their values on you, so to avoid the awkward conversations of why I do or do not like something, where to shop and how much to spend, I shop alone.

- As most chain store clothes do not fit me (I'm short and slight), I tend to buy designer clothes. Still, over 1/2 my wardrobe has been tailored. Not only for fit, but when necessary, I have pieces I'm not wearing altered so I like them more.

Monday, November 8, 2010

My New Title


Tami Mnoian wrote a wonderful piece on me for Imprint Magazine that I wanted to share with you. It's terribly flattering and I must say it's a little weird reading about myself, but hey, if you don't toot your own horn, I guess someone has to...

Thanks Tami!!

(reminder: click on bolded text for links)

Saturday, October 23, 2010

Making Moving Easier Step IV


(click on image for larger view)

Step #4: Mapping

Imagine how easy it would be to unpack if you already know where the majority of your things will go? Like the floor plan, this isn't about having everything 100% set in stone. It's to give you a realistic view of what you have (seeing it in print is a big eye-opener), and gives you an idea of how much, if any, additional storage you may need.

MAPPING: Marrying step 1 + 2, give all your things a home within the home keeping in mind how you want to function in your new space. Use a copy of your proposed floor plan to draw it out (use pencil).

Thursday, October 21, 2010

Making Moving Easier Step III


Step #3: Edit + Sort

Now that you have a idea of how you want to live and an idea of the new space itself, it's time to go through your things. This is so you get reacquainted with what you have, edit out (donate, sell, give away, recycle, and/or trash) what's not adding to your life, and get things sorted so you can move onto the next step, mapping out the new space! Plus the less you have, the less you have to move.

EDITING: I believe our things are tools to help us live the lives we want to live. Ask yourself "does keeping this inhibit or enable me to live the life I want to live?". Don't get rid of something just for the sake of it, or because you haven't used it in X amount of time. Keep things you'll actually use (even if only once a year) and are worth the 'cost' of keeping; we pay by square foot here in NYC, so we literally pay to store things in our apts.

SORTING: Group like things together; all kitchen stuff, office supplies, clothes, tools, batteries, vases, etc. A key concept to being organized, this also helps you edit. Example: seeing a vase on it's own, it's hard to know whether to keep it, but seeing all your 15 vases together you can see maybe it's time to let go of a few. Use shopping bags or designate surfaces for each category and use labels to keep things straight (believe me, it helps!).

It's never too soon to do this as it can take quite some time depending on how much you're starting with.
(click bolded text for more details)

Wednesday, October 6, 2010

Making Moving Easier Step II


(floor plan option 1)

(floor plan option 2)

Step #2: Create Loose Floor Plan
you need: graph paper, pencil, measuring tape

Measure the new space and with graph paper, draw the space to scale.

If you're moving with your existing furniture, measure your pieces and start playing with placement thinking in terms of function. Figure on a few options, it doesn't have to be ONE master plan. The point is to see which if any pieces may not work so you can donate, sell, or give them away as not to lug them to the new space, or how/where you would store them in the new space. For those smaller pieces you are unsure of, bring them and figure it out after you move in.

If you're not moving with existing furniture, this step is important to get you thinking of how to set up your new space. This is how most interior designers start the process of figuring out what's needed, and (very important) what size pieces, so you're not buying random furniture hoping it will work.

This is to get you started thinking about how you'll use your new space, it's not about making 100% of your decisions. Once you're in your new space, you can see what works and what doesn't. You'll also then see where your holes are and what else you may need.

Tuesday, September 28, 2010

The Accessories Closet Continued...


(note: these are progress shots)

I wanted to show you how we reused a few things for the accessories closet from the previous post.

The existing tie rack is now holding belts. The belts that couldn't be hung, sit nicely in a box the client already had. We used the built in drawers to hold handbags. If you look closely, I placed a shoe box in the drawer as a divider.

The rug was rolled up in the coat closet and was on it's way out since she's redecorating. This small one fits well enough in here and she has a larger one that's now in the walk-in clothes closet. I love a rug in a closet; it gives a finished and elevated look to the space...